Regardless of whether you are an amateur or more knowledgeable about photography, here are a portion of our #1 tips that will assist you with working on your photography!
1. Use the Rule of Thirds

This standard assists you with taking eye-getting pictures by utilizing perhaps the best guidelines of arrangement. Assuming you need to take pictures that have a “wow” factor worked in them, the Rule of Thirds is the composition secret you need to exploit!
To use the rule of thirds, imagine four lines, two lying horizontally across the image and two vertical creating nine even squares. Some images will look best with the focal point in the center square, but placing the subject off-center at one of the intersecting points of the imaginary lines will often create a more aesthetically composed photograph.
At the point when a photo is made utilizing the rule of thirds the eyes will wander the frame. An image made utilizing the rule of thirds is normally more satisfying to the eye.

2. Avoid Camera Shake

Camera shake or obscure is something that can torment any picture taker and here are some approaches to stay away from it. To start with, you need to figure out how to hold your camera effectively; utilize two hands, one around the body and one around the lens and hold the camera near your body for help.
Likewise, for handheld shooting, ensure that you are utilizing a shutter speed that is suitable for your lens’ focal length. On the off chance that your shutter speed is too lethargic, any unexpected movement of the camera will bring about your whole photo coming out hazy.
The dependable guideline isn’t to take shots at a shutter speed that is slower than your focal length to limit this issue:
1/Focal Length (in mm) = Minimum Shutter Speed (in sec)
Thus, for instance, in the event that you’re utilizing a 100mm lens, your shutter speed ought to be no lower than 1/100th of a second. Utilize a tripod or monopod whenever possible.
3. Learn to utilize the Exposure Triangle
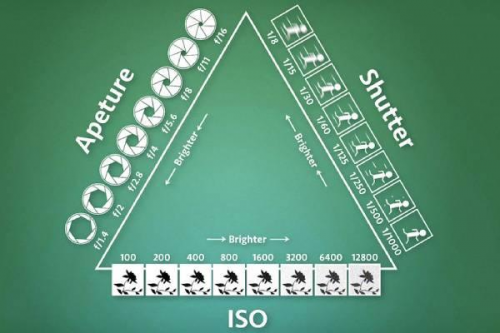
To get your photographs putting their best self forward, you need to dominate the three rudiments: Aperture, Shutter Speed and ISO. You likewise need to comprehend the connections between these three controls. At the point when you change one of them, you would ordinarily need to consider something like one of the others, to get the ideal outcomes.
Utilizing Auto Mode deals with these controls, yet you address the cost of not getting your photographs to look how you would have preferred them, and frequently baffling. It’s a superior plan to figure out how to utilize Aperture-need or Shutter-need modes and at last shoot in Manual mode.

4. Use a Polarizing Filter

In the event that you can just get one channel for your lens, make it a polarizer. The suggested sort of polarizer is round in light of the fact that these permit your camera to utilize TTL (through the lens) metering like auto exposure.
This filter lessens reflections from water just as metal and glass; it works on the shades of the sky and foliage and will help give your photographs the WOW factor. It will do all that while securing your lens. There’s no motivation behind why you can’t leave it on for the entirety of your photography.
5. Create a Sense of Depth
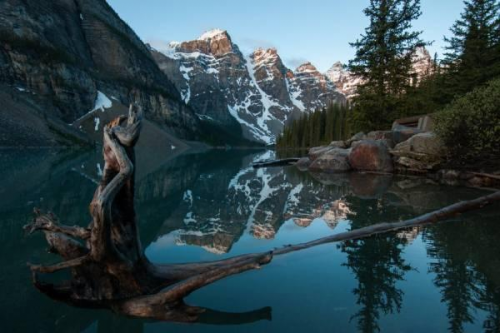
When capturing scenes, it assists with making a feeling of depth, at the end of the day, cause the watcher to feel like they are there.
Utilize a wide-point lens for a panoramic view and a small aperture of f/16 or smaller to keep the foreground and background sharp. Setting an item or individual in the closer view helps give a feeling of scale and emphasizes how far away the distance is.
Utilize a tripod, if conceivable, as a small aperture for the most part requires a slower shutter speed.

6. Use Simple Backgrounds

The basic methodology is typically the awesome in digital photography, and you need to choose what should be in the shot, while excluding whatever is an interruption.
On the off chance that conceivable, pick a plain background – in other words, neutral colors and simple patterns. You need the eye to be attracted to the focal point of the picture as opposed to a fix of shading or an odd structure behind the scenes. This is particularly essential in a shot where the model is put off-center.
7. Don’t Use Flash Indoors

Flash can look harsh and unnatural particularly for indoor representations. In this way, there are different ways you can take a picture inside without flash.
To begin with, push the ISO up – typically ISO 800 to 1600 will have a major effect for the shutter speed you can pick. Utilize the broadest aperture conceivable – this way more light will arrive at the sensor, and you will have a decent blurred background. Utilizing a tripod or an I.S. (Image Stabilization) lens is likewise an extraordinary method to stay away from blur.
On the off chance that you totally should utilize flash, utilize a flash with a head you can turn, and direct the light toward the roof at an angle.

8. Choose the Right ISO
The ISO setting decides how sensitive your camera is to light and furthermore how fine the grain of your picture.
The ISO we pick relies upon the circumstance – when it’s dim we need to push the ISO up to a higher number, say anything from 400 – 3200 as this will make the camera more sensitive to light, and afterward we can avoid blurring.
On bright days we can pick ISO 100 or the Auto setting as we have all the more light to work with.
9. Pan to Create Motion
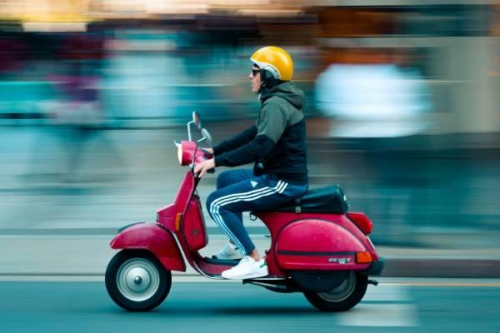
Assuming you need to catch a subject moving, then, at that point utilize the panning method. To do this, pick a shutter speed around two stages lower than needed – so for 1/250, we’d pick 1/60. Keep your camera regarding the matter with your finger mostly down on the shutter to lock the focus and when ready, snap the picture, making sure to follow them as they move.
Utilize a tripod or monopod, if conceivable, to stay away from camera shake and get clear movement lines.

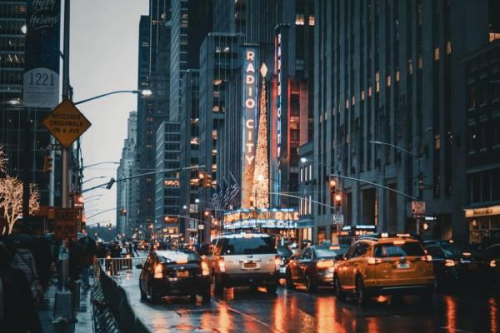
10. Experiment with Shutter Speed

Try not to be reluctant to play with the shutter speed to make some intriguing impacts. When requiring an evening shot, utilize a tripod and try shooting with the shutter speed set at 4 seconds. You will see that the movement of the article is caught alongside some light path.
On the off chance that you pick a quicker shutter speed of say 1/250th of a second, the path won’t be as long or splendid; all things considered, you will freeze the activity.
Try shooting different pieces with moving articles or backgrounds like waves on a sea shore, hordes of individuals strolling, vehicles driving, with various shutter rates to either catch blurred movement or snapshots that freeze everything sharply on schedule.
At whatever point utilizing slow shutter paces to blur movement, it is important that the camera is settled to dispense with camera shake. We suggest the Amazon Basics 60-inch Portable Tripod as a magnificent section level choice for taking photos with slow shutter speeds.

!Reward TIP: Invest More In Learning (and Less on Gear)
In case you’re contemplating burning through thousands on new cameras and lenses, reconsider. Individuals regularly end up frustrated that their sparkling new toys aren’t delivering that “amazing” factor they were anticipating.
You can take staggering photographs that you’ll be glad for, even with a modest digital camera fitted with its standard zoom lens. Be that as it may, you need to have a strong comprehension of the basics. That is the reason it is basic to dominate structure and light, prior to spending anything on new gear.